PyTorch Gradient Manipulation 1
Published:
Spoiler: PyTorch offers about five ways to manipulate gradients.
This notebook is part 1 in a series of tutorials discussing gradients (manipulation, stopping, etc.) in PyTorch. The series covers the following network architectures:
1) Single-headed simple architecture
2) Single-headed complex architecture
3) Multi-headed architecture
but by the end of this post you will know all that you need to know to tackle the other architectures on your own.
The notebook for this tutorial can be found on Google Colab gradient_flow_1.
Note: For the purpose of this discussion, we define a module as either a single layer or a collection of layers in a neural network.
1) Motivation
The motivation behind this post is threefold:
i) Familiarizing Myself with PyTorch
Although PyTorch is easy to prototype with, I don’t fully understand its computation graph and how it applies its gradients via the optim
ii) Playing with Gradient Stopping and Propagating
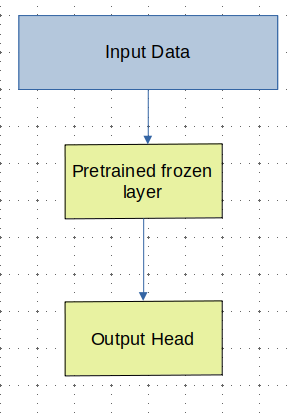
Understanding how to stop propagation of the gradients is essential, especially nowadays, where we use off-the-shelf weights that we then fine-tune; fine-tuning is a straightfoward problem if we have a simple module, as shown below:
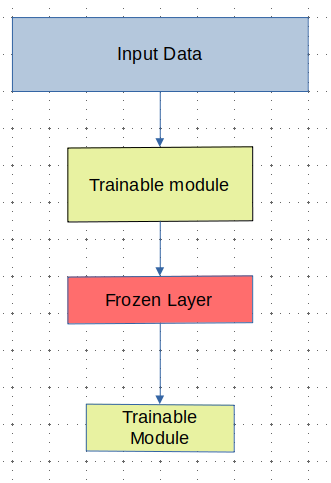
But what happens if we want to skip the application of a specific gradient layer?
Or where we have two networks that only interact occasionally? Or where we have two networks that are related? Consider the following topology with two primary modules: the actor and the critic, as used in the Deep Deterministic Policy Gradient (DDPG) architecture:
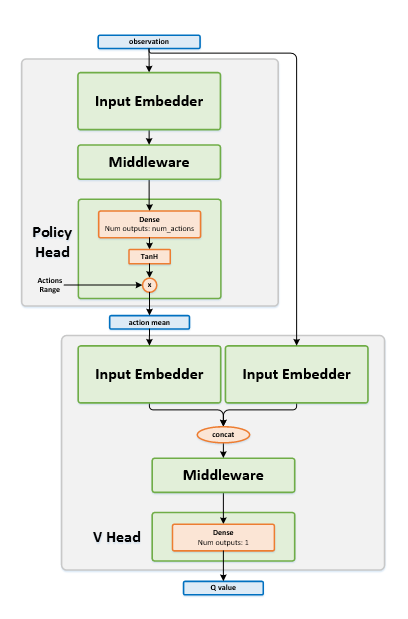
NOTE: Image sourced from IntelLabs: DDPG
We see that the critic (the bottom module) accepts the actor’s output. However, unless we stop the gradient flow, the computation graph will inadvertently backpropagate critic updates through the actor, which is undesirable.
2) Contents
We explore five methods categorized into High-Level, which utilize built-in methods, and Low-Level, where we manually access the gradients.
2.1) High-Level
The following methods are pertinent only to stopping gradients:
detach, which returns a copied tensor with the same values and properties but detached from the computation graph. The original tensor is preserved.no_grad, which is a context manager that disables gradient calculation, settingrequires_gradtoFalsefor all variables created within its scope.inference, which ompletely halts gradient calculations both downstream and upstream. This is a relatively new method, introduced on September 14, 2021, and warrants discussion.
2.2) Low-Level
With direct access to the gradients, we can not only stop gradients but also manipulate them based on our specific needs:
Via the
optimizer, where we exclude the optimizer from receiving the parameters of certain modules.Manual Manipulation, where we extract the gradients and then choose whether to modify or manipulate them before application.
2.3) eval Misconception
When I first started using PyTorch, I mistakenly assumed that eval mode would:
- Put the model into inference mode (turning off dropout and making batchnorm run in eval mode),
- Turn off the computation graph construction.
However, it does not affect the computation graph construction as I had thought.
2.4) Making the Right Choice
Ultimately, each method comes with various trade-offs. We will discuss these below, allowing you to make an informed decision best suited for your application.
3) Problem Setup
We have the following graph:
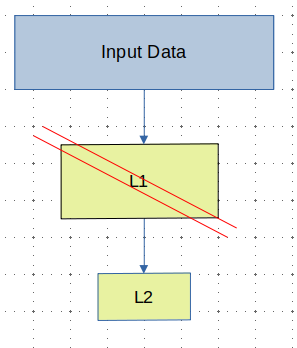
In this setup, we aim to update only the network’s output head (L2). What are the various ways we can accomplish this?
I highly recommend having the colab notebook open as you work through this. I made it a point to plot the resulting computation graph for each setting, making it easier to understand what is happening.
4) High-Level
4.1) detach
detach detaches upstream values from the graph, so we only calculate the gradient backward up to the first detach. Our current graph setup is too simple to illustrate this phenomenon, but the computation graph in the follow-up post will work well.
4.1.1) Observations
Notice two things from the cells:
- The output of the
printstatements shows that thegradof L1 isNone. - L1 does not exist in the computation graph (contrast this with the Control).
4.1.2) Usecase
- Stopping gradient flow.
- Saving memory.
Torch tensors keep track of data such as the computation graph. By detaching these tensors, we drop the computation graph of all upstream operations up to the current variable.
- Converting the tensor to
numpy.
Attempting to directly convert to numpy will result in an error because numpy does not track the computation graph. It is safer to have a clear distinction between numpy arrays and torch tensors.
import torch as T
a = T.tensor(1.0, requires_grad=True)
b = a + a
b.numpy()
4.2) no_grad
4.2.1) no_grad in action
It can be used as follows:
#!pip install -q torchviz
import torch as T
from torchviz import make_dot

# Requires grad = True to construct graph
x = T.ones(10, requires_grad=True)
with T.no_grad():
	pass
y = x ** 2
z = x ** 3
r = (y + z).sum()

make_dot(
    r,
    params={"y": y, "z": z, "r": r, "x": x},
    show_attrs=True
)
Uncomment the first line if you do not already have torchviz. Then, play around with moving y or z into the T.no_grad() context.
4.2.2) Observations
The graph of
no_gradis the same as the graph ofdetachThe printed information shows that
L1hasNonegradients, similar to the previous method.
4.2.3) Usecase
Stopping gradients.
Improving computational speed and memory consumption.
no_gradtells PyTorch to not track operations within the context, which means that the computation graph is not created.Furthermore,
no_gradis faster thandetachbecausedetachreturns a copy of the input tensor (just without the computation graph), whereasno_graddoes not persist the computation graph of variables within its scope.Less room for mistakes.
Keeping both the torch tensor and numpy array around might not be your intention, and you might accidentally operate on the wrong variable.
4.3) inference
4.3.1) Observations
We discuss two observations for this code section:
Viewing the computation graph, we see that no values are tracked (hence an empty singular block)
Solution If we want to allow downstream calculations that themselves are not in inference mode, we must make a clone of the tensor. We display the relevant sections of this in section 4.3.2) Relevant code
We see this method produced the same computation graph as in the detach and no_grad settings. Like no_grad, inference() is a context manager. In no_grad and detach, upstream values were not tracked in the computation graph; in inference, even downstream values are not tracked.
*Pytorch CPP Inference mode docs
4.3.2) Relevant Code
We generated the two graphs by following the setup from this official Twitter post in mind about
def _inference_forward(self, X):
  # First var is a inferenced-var
  with T.inference_mode():
    tmp = self.l1(X)
  try:
    # Try to do a non-inference forward pass
    return self.l2(tmp)
  except Exception:
    print(f"Trying to use intermediate inference_mode tensor outside inference_mode context manager")

    # Getting pure-inference
    with T.inference_mode():
      grad_disabled = self.l2(tmp)
    # Convert inferenced-var and allow us to
    # do a normal forward pass
    new_tmp = T.clone(tmp)
    grad_enabled = self.l2(new_tmp)
    return grad_disabled, grad_enabled
4.3.3) Usecase
Gradient Propagation It is possible to use this method to stop gradients, but there are easier ways to accomplish this.
Inference Speed While no_grad stops operation tracking, inference disables two other autograd features: version counting and metadata tracking.
5) Low-Level
In the following methods, we work directly with the computed gradients instead of detaching variables or telling PyTorch to ignore blocks. This low-level manipulation is useful for making complex modifications to our gradients. While it won’t be relevant here, it’s worth mentioning ahead of time.
Furthermore, whereas the methods in the High-Level section stop all gradients from flowing upstream, the Low-Level methods allow us to selectively skip modules.
Things to Note:
Gradients are stored in the model parameters when
loss.backwardis called. Theoptimizer.stepcall simply applies these gradients. Thus, using the optimizer method is more or less equivalent to the manual manipulation method.Unlike the resulting computation graphs in the High-Level section, where no
L1information is kept, in both Low-Level solutionsL1is still tracked even if unused (as verified by quick tests in the corresponding cells).
5.2) Colab: optim.Optimizer
Rather than using optim.SomeOptimizer(model.parameters()), we use optim.SomeOptimizer(model.l2.parameters()), which instructs our optimizer to apply gradients only to the L2 parameters.
5.2.1) Usecase
- Gradient Stopping: As with the above methods, this approach can “freeze” a layer.
- Gradient Manipulation: This allows specification of per-module hyperparameters, though it does not provide fine-grained control.
5.3) Colab: Manual Manipulation
Here, unlike the above section where the optimizer applies our gradients, we manually apply the gradient.
5.3.1) Usecase
The primary use-case for this method over all others is custom gradient applications. For instance, if you wish to zero out gradients every other step or scale the gradients under specific conditions.
6) Closing Thoughts
6.1) Gradient Stopping
The “simple” methods such as no_grad are generally easier to implement and should be preferred if your goal is merely to stop gradients from flowing upstream. My recommendation is to use no_grad wherever possible as it is faster than detach. This preference is somewhat subjective, but I find no_grad also clearer because it explicitly excludes a block of computations that will not be used further down. When you detach a variable, you now have both the torch tensor and the numpy array, which could lead to confusion.
I recommend avoiding inference for gradient manipulation unless you’re absolutely certain you have a compelling reason. I do not see a scenario where inference would be preferred over no_grad, especially when considering that using no_grad allows you to avoid unnecessary copying of variables.
6.2) Gradient Manipulation
If feasible, use the optimizer approach as it leaves less room for error. However, the Manual Manipulation method is ideal if you need to apply custom operations to your gradients. This is particularly useful for scenarios where you might want to scale gradients for specific layers under certain conditions or zero out gradients intermittently.